Instadock
Vital for
stations, especially if they're
trade hubs or regular stops or are in LS, NS,
Pochven, or
Thera. Also nice for
structures, but not vital for them because of
tether.
If you dock at a station
without using an instadock, your ship can be instantly destroyed after exiting warp.
Click to show/hide why.
- clicking Dock on a station > 150 km from your ship makes it warp to the station and attempt to dock after exiting warp
- however, station docking range is 300 m, and a little under half of the time, your ship will exit warp further than 300 m from the station
- if this happens, your ship will automatically start moving toward the station at subwarp speed and will dock once within 300 m
- during this short "slowboat" move, your ship is lockable and can be instantly destroyed by suicidal PvPers in HS (or by the non-suicidal sort outside HS)
- production: undock in something cheap & quick like a fast frigate with a microwarpdrive, double-click in space back toward the station, then save a BM that is:
- at 0 distance from the station as per the Overview and not in a place where the ship is bumping/jostling against the station's model
- you can fly into the model to test its boundaries. stations have invisible collision models which can be quite different from their visible 3D models
- at least 5 km inside the docking radius. ships exit warp with their nearest edges randomly placed ~2,500 m from their destination, so account for 5 km variance
- Larenon en Marland's Station Cyno Placement Guide has screenshots of good instadock placement locations for most NPC stations
- if the station isn't a kickout, a BM saved right after undocking works as crude instadock. always manually position BMs for kickouts, though!
- (optional): away from the undock. useful where bubbles can be used (NS/Pochven/Thera and possibly LS with an Insurgency) because bubbles can catch or drag you
- ideally the BM's as far from the undock and as out-of-line with common incoming warp vectors as possible
- usage: warp to the BM and dock immediately after exiting warp (activate a nullifier before initiating warp if the situation warrants it).
click to show/hide a docking trick
- if a station or structure is set as your current Route destination, you can warp to an instadock BM for it then activate Autopilot mid-warp. your ship will auto-dock
- don't use Autopilot otherwise. if you don't initiate warp first, Autopilot will warp you 10 km away from your destination then slow-boat the rest of the distance
Insta-undock
Also
vital for stations, since ships can be destroyed at
any station in EVE after warping off if the align for the warp takes longer than two
ticks.
- production method 1 (easiest & fastest): undock in a cheap ship with a probe launcher fitted and loaded with 8 probes ("core" launchers & probes are cheapest)
- production method 2:
click to show/hide a much-slower manual-burning approach
- undock in a fast frigate fitted with a MWD and maybe overdrive injectors and/or nanofiber internal structures. double-click in the appropriate direction & MWD
- if it's a horizontal undock, use the front-facting vector on the tactical Tactical Overlay as a guide for where to double-click
- if it's vertical, orient the camera straight up/down then spin the camera around a bit to check if the vector circle is straight up/down. double-click as necessary
- save your undock BM once you're at least 175 km away from the station (but preferably quite a bit farther)
- usage: after undocking, warp first to the insta-undock before warping elsewhere (activate a nullifier before initiating warp if the situation warrants it)
Perches
AKA bounces, pings, tacs, tacticals. They're for visually surveying grids,
dscanning grids without appearing on them, juking interdiction/bombs/SBs/lances, etc.
Objects near a destination (e.g. planets, moons, structures)
can be useful ad hoc perches, but not always! Competently-made perch BMs will almost always be superior.
- inline on-grid perches are quickest & easiest to make but the least safe, and may or may not work for avoiding/juking stuff
- unaligned on-grid perches are superior if you have time to make them. these are what you want if you care about positioning, reliably bypassing threats, etc
- production: use probes and/or MWD around to make BMs at useful positions relative to objects of interest
- it's best to place perches perpendicular-ish to the line(s) connecting commonly-visited objects so you can bypass bubbles (more on that later)
- some objects are not in a shared horizontal plane, i.e. they may be "above" or "below" each other. pay attention when positioning your perches
- perches directly above/below an object are better than nothing, but it's generally better to be off at an angle relative to all obvious warp vectors
- the best perches avoid all object vectors: stations/structures, planets/moons, gates/landmarks/beacons, etc. hit Shift + Alt + X to show moon brackets
- dscan or offgrid perches let you dscan a grid without directly visiting it
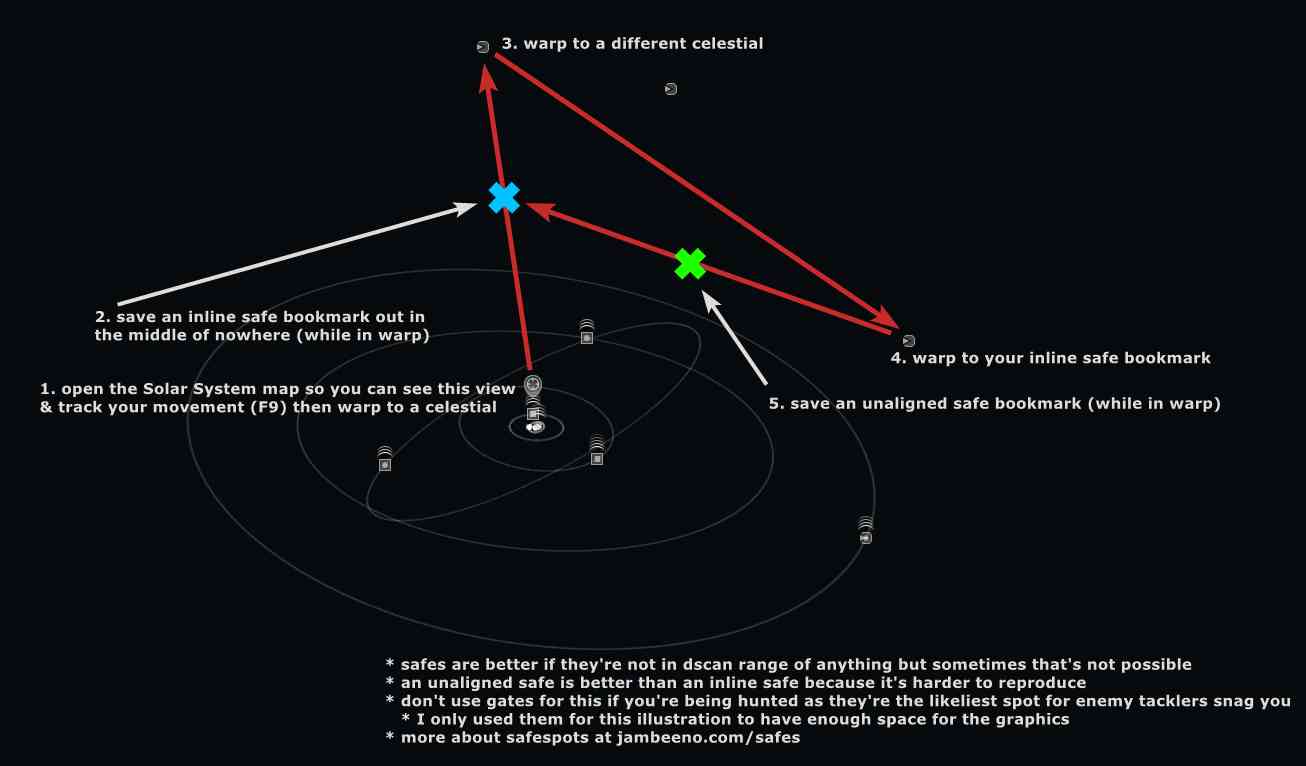
- production method 1: BM a spot mid-warp. less useful than method 2 but much quicker to make
- warp to something in dscan range of your grid of interest → hit Control + B while in warp to it → save the BM when you're between 14.3 AU and ~50,000 km away
- closer minimizes warp-to time whereas farther avoids being
1-shot combat probedif a skilled player has combat probes on your celestial cluster, a single 4.05-second scan will return your position if you're uncloaked, even if you're in warp
it can take less time than that—and even be essentially instantaneous—if they time the scan to finish as you land
- note that if you're sufficiently far from a grid, you can't tell exactly where ships are with dscan (e.g. "Is the dictor on my outgate or a moon?")
- production method 2: use on-grid probes to go off-grid. this also lets you make the perch unaligned to anything
- note that these perches are inherently 1-shot combat probable by attenative non-dumbies, so don't hang around at them in any uncloaked ship
- if there's nothing on the grid other than the gate (e.g. gate guns, wrecks), jettison something expendable so you can tell when you leave the grid
- get your formation on-grid and increase its size until a probe in your preferred direction of travel disappears (grids are usually ~8,000-12,000 km across)
- decrease the formation size one tick, re-Analyze, save that probe as a BM and warp to it
- re-center probes & re-Analyze at the new position. if the probe in your preferred direction disappears, shrink the formation until it re-appears, BM it & warp to it
- repeat until you leave the grid. you'll know you've left the grid when the gate guns (or your jetcan or whatever) disappear
- it may be useful to recall your probes immediately after you warp to every BM then relaunch them after landing
- grids still stretch & snap. if you keep your probes out while warp-chaining, you may just stretch the grid rather than crossing its boundary
- usage: warp to the perch to see, dscan and/or elude what's there. it's good to habitualize warping to perches instead of gate-to-gate, especially with low-tank ships
- the BM pack sellers up top offer "all known space" packs at rates that are very affordable for established players. or assemble your own!
- it is very satisfying to land at a perch and see a smartbomber. if your perch is properly unaligned you can warp and jump right in front of their face
- you can also warp to a perch on your ingate before warping to your outgate perch if you suspect a mid-warp smartbomber is operating in the system